If you want a solid, dependable foundation for your home, deck, or shed, concrete piers are worth a closer look. Concrete piers offer lasting support by spreading the weight of a structure over a wide area, helping to prevent sinking and uneven settling. They’re made by pouring concrete into holes drilled into the ground, and once cured, these piers can hold up even large buildings with confidence.
You’ll spot concrete piers everywhere—supporting backyard sheds, holding up bridges, or buried beneath tall buildings. People choose them because they’re tough, practical, and work in all sorts of soil and weather. If you’re curious about how they work and what makes them a good choice, you’re in the right place.
Whether you’re starting fresh or patching up an old foundation, it pays to know your options. Take a look at what concrete piers can offer and how the construction process actually goes, so you can head into your project with a bit more peace of mind.
Fundamentals of Concrete Piers
Concrete piers are a key part of supporting buildings, decks, and other structures, especially on soil that shifts or can’t support heavy loads evenly. Grasping the basics of how they work and the options out there helps you make smarter choices when planning foundations.
Definition and Purpose
Concrete piers are vertical columns made from reinforced concrete that go deep into the ground. Their main job is to transfer the weight of your building down to stable soil or bedrock below.
You’ll often see concrete piers under homes, sheds, or decks, especially where the ground is uneven or soft. These piers help keep your structure from settling, tilting, or cracking as the years go by.
Engineers figure out the size and depth of each pier based on how much weight it needs to support and the soil it’s sitting in. A well-designed pier foundation keeps your building steady, even if the top layer of soil shifts with the seasons.
Types of Concrete Piers
There are a few kinds of concrete piers, each fitting different needs and ground conditions. The two most common are:
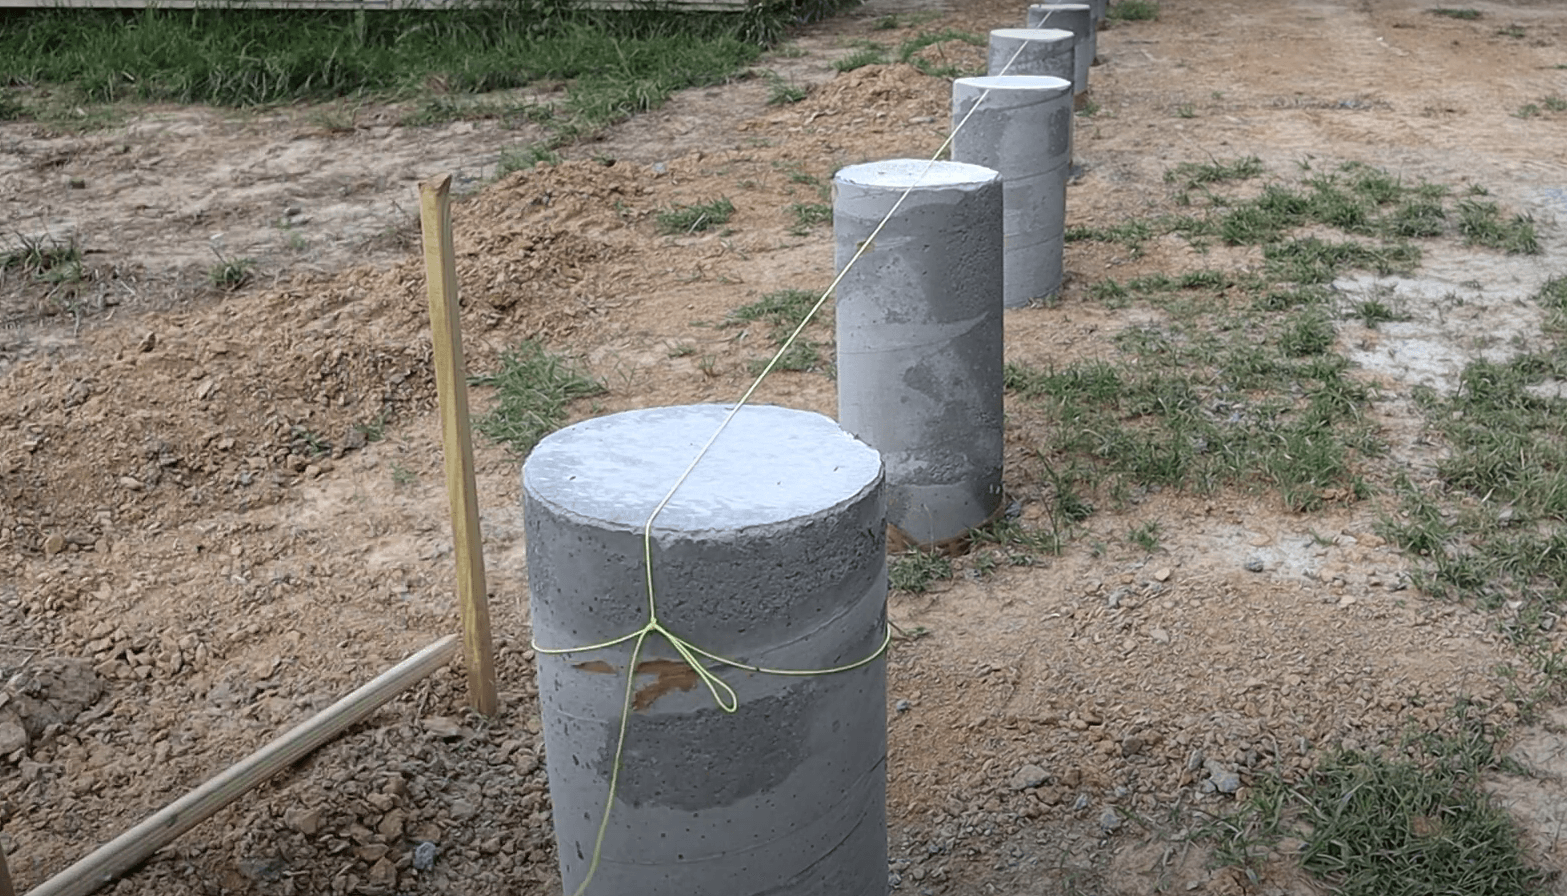
- Cylindrical Piers: Round, drilled deep into the ground. These are typical for bigger buildings where you really need strength.
- Rectangular Piers: Shaped like blocks or columns, these are easier to build for smaller projects or tight spaces.
Sometimes you’ll see drilled caissons or helical piers for extra support or faster installs. Which one you pick depends on the building’s weight, the soil, and how much room you have.
Here’s a quick comparison:
| Type | Shape | Common Use Cases | Depth Range |
| Cylindrical | Round | Large buildings, bridges | 5–30 feet+ |
| Rectangular | Block/column | Small sheds, decks | 3–10 feet |
| Drilled Caisson | Large round | Heavy, deep foundations | 20 feet+ |
| Helical Pier | Spiral steel | Light buildings, poor access | 5–30 feet |
Structural Integrity Considerations
Strong piers mean a stable building. What matters most is the pier’s depth, its diameter, and how much reinforcing steel is inside. The deeper you get into solid ground or rock, the stronger your structure will stand.
Moisture, freezing, and soil movement can mess with your foundation. Using the right materials and getting a good soil test helps your piers last. Keeping proper spacing between piers also helps prevent uneven settling and cracks.
Regular checks and a little maintenance now and then can save you from big repairs later. Some pros say that with good design and care, you can add years to your foundation’s life. Reinforcing with steel bars and letting the concrete cure fully gives you even more strength.
Site Planning and Soil Requirements
Planning for concrete piers starts with checking the ground, measuring the frost line, and making sure the soil can handle the load. Skipping these steps can lead to foundation trouble and headaches down the road.
Assessing Soil Conditions
The type of soil under your feet matters a lot for pier stability. Is it clay, sand, loam, or rock? Clay can swell and shrink, shifting piers around, while sandy soil drains fast and might need deeper or bigger piers for support.
Quick soil assessment checklist:
- Dig a test hole as deep as you plan for your pier.
- Watch for changes in color or texture as you go.
- Squeeze a handful—does it clump or fall apart?
A pro soil test gives you details on moisture, density, and shifting risks. That’s how you know if you need to go deeper or change your design. If you’re not sure about your soil, testing is a smart move. Weak or mixed soils may need deeper piers or a different setup to avoid settling and cracks.
Determining Frost Line Depth
The frost line is how deep the ground freezes in winter. Concrete piers need to go below this point, or frost can push them up and cause damage. The depth changes depending on where you live.
In cold places, the frost line is deep; in warm spots, it might only be a few inches down. Your local building department can tell you the exact number.
Going deeper than the frost line keeps your foundation steady through freeze-thaw cycles. If you skip this, piers might move or even break. Always double-check the required frost line depth before you start digging.
Load-Bearing Capacity and Design
Checking how much weight your soil can handle is a must. This includes the pier, the building, and any extra loads.
A structural engineer can crunch the numbers for you, looking at soil data to figure out the right pier size and depth. Softer soils might need bigger or longer piers, and sometimes extra steel for support.
Building codes usually spell out minimum sizes and loads for different soils. Ignore those, and you could be facing major repairs or even safety risks.
Construction Process for Concrete Piers
Installing concrete piers is a step-by-step process: prep the site, use the right materials, reinforce everything, and finish properly for a strong, lasting foundation. Each step matters if you want your piers to hold up for the long haul.
Drilled Piers: Step-by-Step
First, mark out exactly where each pier goes. Then use drilling equipment to bore holes down to solid ground or rock. The size depends on your load and soil.
If the soil’s loose or there’s water, you might need a casing to keep the hole from caving in. Clear out any debris, mud, or water before pouring. Concrete goes straight into the shaft, often through a tremie pipe to keep things clean. The basic steps are drilling, cleaning, reinforcing, pouring, and then curing the concrete until it’s strong.
Formwork and Materials
Formwork keeps the concrete shaped until it hardens. For drilled piers, the soil usually acts as the form underground, but if your pier sticks up above ground, you’ll need forms made of wood or metal.
What goes in? Concrete and steel, mainly. High-strength concrete is key, and sometimes you’ll mix in additives for better workability or weather resistance. If you’re attaching wood or steel columns, pre-made post bases can help with stability.
Mix your materials well and pour carefully to avoid air pockets or weak spots. Clean out the formwork before pouring—don’t skip that step.
Reinforcement and Anchoring Methods
Drop steel rebar into drilled holes before pouring the concrete. That steel helps stop cracks and spreads the load. Make sure the bars are spaced right and tied together tight.
If you need to attach posts or columns, set anchor bolts into the wet concrete. Post base brackets are handy for tying down wood or metal columns after the pier cures. You want those anchors lined up just right for your vertical supports.
Sometimes you’ll need extra reinforcing cages or spirals, especially in earthquake zones. The reinforcement and anchoring process also checks for enough space between steel and the concrete’s edge to keep rust away.
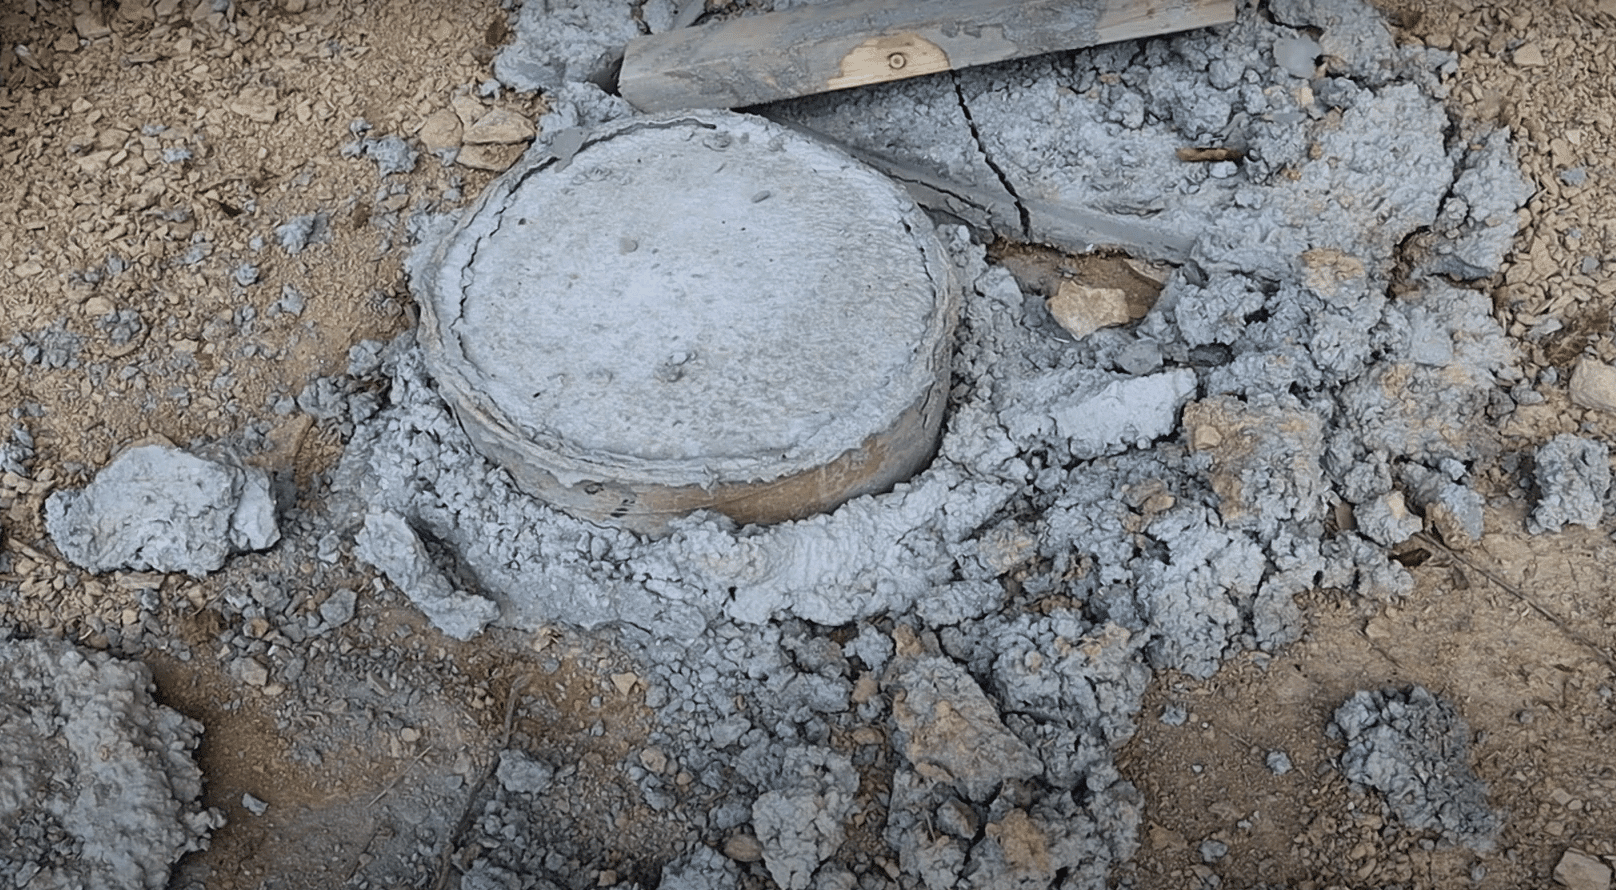
Curing and Finishing
Curing means letting the concrete harden slowly so it reaches its full strength. This can take several days—sometimes even a week or a bit longer, depending on things like temperature and humidity. To keep the moisture in, cover the pier with wet burlap, plastic sheeting, or use a curing compound.
While the concrete is still soft, you’ll want to finish the surface. The top gets smoothed and leveled so any post base, bracket, or anchor bolt sits right. Keeping things even here matters, since it helps the pier carry loads the way it’s supposed to.
After curing, give the pier a close look for cracks, honeycombing, or surface issues. Taking your time with curing and finishing really pays off for the long-term durability of the concrete pier foundation.
Applications and Advantages of Concrete Piers
Concrete piers provide sturdy support for buildings and outdoor structures in all sorts of situations. Their strength and stability, especially in tricky soils, make them a go-to for a lot of projects.
Use in Buildings and Decks
You’ll spot concrete piers under houses, offices, and even big commercial buildings. They’re also a solid base for decks, porches, gazebos, and sheds. Since they’re set deep in the ground, they help spread out the weight. That makes them a reliable choice whether you’re building something small or going big.
Spacing piers under decks and porches helps with airflow underneath, which cuts down on moisture and keeps rot and pests at bay. If your site isn’t perfectly flat, no worries—each pier can be set to the exact height you need. For larger buildings, adding steel bars inside the concrete boosts strength, making the whole setup more dependable for years to come.
Durability in Various Soil Conditions
One thing about concrete piers: they last. Even in tough soils—clay, sand, loose fill, rocky ground—they hold up for a long time. No worries about rot, bugs, or weather damage, since concrete doesn’t really break down like wood does.
Reinforced piers (the ones with steel bars inside) are even tougher. They handle ground movement and settling that can mess with other foundation types. If your climate is wet or has big seasonal swings, concrete’s resistance to moisture is a huge plus. That’s why reinforced concrete piers are so common for both new builds and repairs.
Comparison With Other Foundation Types
Concrete piers have some clear advantages over wood, steel, or masonry piers. Wood can rot or get eaten by termites, but concrete stays put and stable even in damp soil. Steel is strong, sure, but it costs more and can rust if you aren’t careful.
Compared to slab foundations, concrete piers are just more flexible. You can use them on sloped ground or where the topsoil is weak—places where slabs might crack or need a lot of prep. Usually, concrete piers win out for strength, cost, and weather resistance.
Comparison Table
| Foundation Type | Durability | Cost | Soil Compatibility | Pest Resistance |
| Concrete Piers | Excellent | Moderate | Wide Range | High |
| Steel Piers | Very Good | High | Wide Range | Very High |
| Wooden Piers | Fair | Low | Limited | Low |
| Masonry Piers | Good | Moderate | Fair | Moderate |
Frequently Asked Questions
Concrete piers are a popular pick for supporting buildings and all kinds of structures. People value them for strength, stability, and their ability to last in a bunch of different soils.
What is the purpose of a pier?
A pier’s job is to carry loads from above and transfer them safely into the ground. It’s the backbone for decks, houses, bridges, or pretty much any heavy structure. Piers come in handy where the top layer of soil just can’t hold much weight on its own.
What is a concrete pier?
A concrete pier is a thick, upright support made by pouring concrete into a hole or a tube-shaped mold. The shape might be round or square, and the size depends on what it’s holding up.
How long do concrete piers last?
If they’re built and installed right, concrete piers can last for decades. The mix, climate, soil moisture, and how well the job’s done all play a part. Most of the time, a good concrete pier will keep things steady for 50 years or even longer.
How deep should a concrete pier be?
How deep you need to set a concrete pier really hinges on things like your soil, local frost depth, and just how much weight that pier’s going to carry. In colder areas, you’ll usually have to dig past the frost line—nobody wants their foundation shifting every winter.